A knot better!

I am writing this on the very last day of my work placement here at the University of Edinburgh. I have had an amazing six weeks learning about caring for the historic musical instrument collection. Many of the things I have learnt can be applied to other kinds of collection material but some things are very instrument-specific. So I thought I’d talk about some of those.

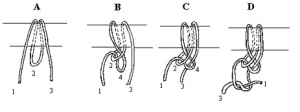
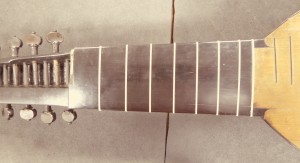
For example, I have learnt how to make frets from gut (the same material used for early strings) for 17th century string instruments. This involves using a special knot to tie the gut round the fingerboard, making it as tight as possible and sliding it to the right position, then burning the ends so it won’t unravel (and so it looks really neat). Fire is something I never thought I would use in conservation, so this was awesome!
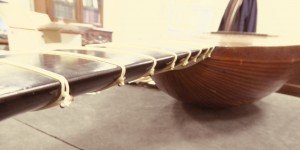
New frets on a archlute - the knots are on the back of the fingerboard, at the top, where they would be least disruptive to the player

New frets on a archlute – the knots are on the back of the fingerboard, at the top, where they would be least disruptive to the player

How to tie the fret knot. Image from Gamut Music Inc.

How to tie the fret knot. Image from Gamut Music Inc.

There is a mathematical equation for positioning the frets on the fingerboard in order to achieve perfect semi-tones. However, these instruments are not in playing condition, so it doesn’t matter too much about the precise positioning of the frets. You may ask, why put them on in the first place, if they are not needed for playing? For the same reason you’d take plastic strings off a baroque instrument and replace them with new gut strings: the instrument should be made to look complete and correct so the viewer understands how it works, and how it should look. It should look as if it could be played, and if it were played it would sound authentic. But let’s not get started on authenticity of sound…

New frets on an archlute - front view

New frets on an archlute – front view

Many of these instruments did have frets, and most people wouldn’t know (I didn’t) but it makes a lot of difference to the sounds they would have made. Also they did not have nylon in the 17th century!

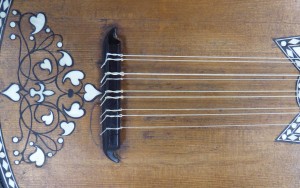
However, it’s not just about using the correct materials, but using them properly and wasting as little as possible. So when I put strings on a baroque guitar, the strings which have been made (by Gamut, an early music string maker) have a few extra inches that are not needed. These few inches can then be used to make frets, for example. The knots at the bridge of a guitar or lute can be tied in many different ways, but the way we do it here is so that all the ends point downwards (when the instrument is held as if for playing) and are tucked away behind the bridge. Beautiful!

Baroque guitar with new gut strings, detail of bridge. Check out that inlay!

Baroque guitar with new gut strings, detail of bridge. Check out that inlay!

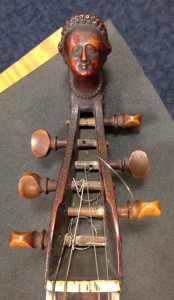
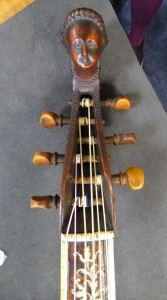
Last week I did a short presentation to show the CRC staff what I have been doing during this placement, which I rounded off with before and after images of the head of an instrument called a viola da gamba – the first string instrument I had the pleasure of working with. And the loveliest, I think. In Southampton I volunteer at the SeaCity Museum, working with their objects conservator who likes to personify things in the collection, describing a piece of newly consolidated Murano glass as ‘a lot happier’, or a rusty medieval sword as ‘not very well’. I think this can be applied nicely to the viola da gamba. She looks great for a 319 year-old, and genuinely seems happier with her new strings.

Viola da gamba before cleaning and re-stringing

Viola da gamba before cleaning and re-stringing

Viola da gamba after cleaning and re-stringing

Viola da gamba after cleaning and re-stringing

Post by Harriet Braine, Preventive Conservator Student Placement

Saying Goodbye to Dr. Coffin

This week, we say farewell to our conservation intern, Samantha. To mark the end of her 10-week internship working on the Thomson-Walker collection, we put some questions to Samantha to find out more about her time working on the project:T_W Sam

  1. Why did you decide to apply for the internship at the CRC?

When I graduated last June I decided to make a career plan. This included at least one year of work experience, which would allow me to put my education into practice, strengthen my skills set, and improve areas of weakness. This need to develop had been my main ambition when applying for opportunities. However this particular internship intrigued me for a couple of other reasons. I was interested in the idea of working for a University conservation studio and how this might compare with working for a museum for instance. Inviting also was the prospect of leading a big project during the first phase of conservation; when you train as a conservator it is unusual to work on a large collection independently and so this was an excellent opportunity to do so.

  1. What did you expect from the internship? Has anything surprised you?

I thought I would be working solely on the Thomson-Walker collection, but I very quickly recognised that this was not the case. I would indeed be occupied with the Thomson-Walker collection on a daily basis, however I would also be giving tours, supervising volunteers, teaching taster days, writing blog posts and assisting with an exhibition, which was a pleasant surprise.

  1. Tell us about what you’ve learnt over the past 10 weeks.

I now know how to survey a collection and create a project proposal. Creating a programme of conservation and preservation that doesn’t just benefit one print but over 2000 felt very daunting 10 weeks ago. But by taking small steps, and keeping in mind that my approach would have to be interpreted by interns after me I have been able to get through it by staying methodical, and making vigorous notes and to do lists!

  1. Can you describe for our blog readers a typical day within the CRC conservation studio?

The conservation treatment of the Thomson-Walker collection included removing old backing boards and using a carboxymethyl cellulose poultice to remove tape and adhesive. As this poultice is essential to the treatment I would prepare the CMC the previous evening and construct the poultices as soon as I arrived at the studio the following morning. Once these were ready I began the treatment. Because of the demanding nature of the project, I worked on a number of prints simultaneously, aiming to conserve and rehouse around 10-15 per day. Whilst this is going on I might assist with a tour of the conservation studio, discussing the project with visitors and giving demonstrations. And then during the second half of the day a volunteer would help me to create archival folders to rehouse prints that I’d previously conserved. The CRC has a number of dedicated volunteers, usually students with an interest in conservation wishing to gain experience before embarking upon a relevant degree. This partnership has been very successful for the Thomson-Walker collection, as it has allowed me to conserve more prints, whilst a volunteer has gained new skills and experience.

  1. What have you enjoyed most about your time with us?

Working within a University. I was unsure how this would compare with my previous experience of working within a museum or archive setting, but the difference has been huge. One of the main objectives of the CRC conservation studio is to make their collection more accessible and fun. I have really embraced this ideology during my time here, and hope to be an advocate of such aims during my future career. Working in such an open and exciting atmosphere has also done wonders for my confidence.

  1. What have you found most challenging?

Creating a rehousing programme for the Thomson-Walker collection. This wasn’t just difficult because of the sheer number of prints but because they are all completely different sizes! I started out by wrestling with measurements, conservation catalogues, budgets, time restrictions, calculations, and ordering forms. Once this was all worked out I could relax a little. That was until my order arrived…then I had to make sure that all those calculations had been correct and actually get the project underway.

  1. What shall you miss about the internship?

As an intern, it is not always possible to be self-directed, and projects aimed for interns are typically already set up and ready to go. For this reason I shall miss the independence I have experienced whilst working on the Thomson-Walker collection. I have enjoyed creating and following my own rules.

  1. Do you have a favourite print?

Yes! I recently discovered a print of Dr Albert Isaiah Coffin (1790–1866). Whilst the print itself isn’t spectacular I found the name rather amusing and decided to do some T_W Coffinresearch on the American herbalist. It turns out that Dr Coffin was a man ahead of his time and has even been called a revolutionary. Instead of paying extortionate fees for a conventional doctor, Dr Coffin advocated that one should learn the secrets of medical botany and be their own doctor. In the north of England, Coffin delivered lectures to working people and set up botany societies where people could meet to learn and discuss medicine, as well as sharing problems and tips. This idea was nicknamed, “coffinism.” In a way I feel that Coffin’s aims are echoed within the CRC conservation studio…well not quite, but we do offer conservation taster days!

  1. What advise would you give to the next intern working on the Thomson-Walker collection?

The conservation studio is currently a very exciting place to be working for all of the reasons I’ve mentioned above. Take advantage of all the extra activities on offer. Work hard but play harder!

From all of us in the conservation studio, and the CRC as a whole, we would like to thank Samantha for all her fantastic work, and wish her the best of luck in her future career. In the meantime, we will be sure to keep you updated on how the Thomson-Walker project developments….

Post by Samantha Cawson, Conservation Intern

Stirling Work

Last week, a contingent from conservation left their natural habitat of the studio to embark on a day trip up North. Stirling University was our destination, more specifically their conservation studio, in order to learn more about their special collections, and the conservation work they’re doing. Stirling University is currently part way through a Wellcome Trust funded project to conserve and re-house the records from the Royal Scottish National Hospital. Working on this project are conservator Elizabeth Yamada, with interns Kat Saunt and past University of Edinburgh conservation intern Erika Freyr (who you may remember from her work on the Laing project: http://libraryblogs.is.ed.ac.uk/conservation/2014/06/20/conserving-laing-iii/). We had previously been delighted to have had the chance to show Elizabeth, Kat and Erika our own studio at the Main Library and introduce them to the work we are doing and the collections we hold. We were therefore pleased to have the opportunity pay them a reciprocal visit and learn more about their own project.

First stop was a visit to their conservation space, and to find out more about the project and their approach to conserving the Hospital’s records. Having converted an old bindery for use as a studio, space was at a premium and with so many records requiring attention, they certainly had their work cut out! The aim of their project is to stabilise the records – through surface cleaning, flattening, tear repair and rehousing – focusing on making them accessible to readers and researchers. It was interesting to learn about how they manage their time, and their thoughts behind deciding what level of treatment they should carry out. It was apparent that time, space and resource constraints made project management so important – something that many people, of all professions, will be able to identify with!

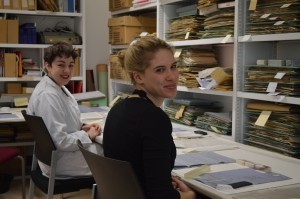
Stirling Studio

Erika and Kat working in their studio

We also had the opportunity to take a closer look at examples from both the University’s wider special collections and those from the Royal Scottish National Hospital. We got a fascinating, and sometimes harrowing, insight into the human stories contained within the archives and, the photographs in particular, gave a glimpse into the daily lives of those that were housed at the hospital.

However, what came as the biggest surprise to us was that, despite not running any History of Art or Fine Art courses, Stirling University has a vast and important art collection with works ranging from paintings by the Scottish Colourist, J.D. Ferguson to a sculpture by Barbara Hepworth. Housed within the Pathfoot Building, there are works by world famous, and home-grown, artists around every corner and in the numerous courtyard spaces. The art collection, and the temporary and permanent exhibitions they hold, are open to the public and I would certainly recommend a visit…

As conservators, we do not work in isolation and visits such as these are important in forging those links with other institutions and to learn how other studios and conservators work. It is a great opportunity to share knowledge and skills thus developing the profession as a whole.

It just leaves me to say big thank you to the conservators at Stirling University for taking the time to show us their work and collections. If you would like to learn more about their project, you can read their blog at:

http://archives.wordpress.stir.ac.uk/2015/01/22/work-placements-in-conservation-2015/

Post by Emma Davey, Conservation Officer